Hercules Version 4: Installation and Operation
Contents
Building and Installing
Configuration
Creating DASD volumes
Operating Procedure
Technical Support
Building and Installing
By far easiest and most direct way to build Hercules is
to use Bill Lewis's fantastic
Hercules Helper tool, and not the below manual method.
Hercules Helper
(for both Windows
and non-Windows)
completely automates the entire build process of downloading and installing all of the
needed pieces and running all of needed commands to create a working Hercules. Simply
download Bill's tool and enter a few simple commands, and within minutes you should have
a working Hercules on your system.
Building from source - Windows
If you wish to build Hercules yourself manually however, the procedure is as follows:
- Clone the Hercules source code git repository
(recommended), or download the
source code .ZIP file
from Github (discouraged!).
git clone https://github.com/SDL-Hercules-390/hyperion.git <directory-name>
If you don't have git on your system, you will need to install it.
Note: By downloading the source code .zip file (discouraged!)
or by cloning the repository (recommended)
you agree to the terms of the Hercules Q Public Licence.
-
Hercules for Windows is built using the Microsoft Visual C/C++ (MSVC) compiler.
Fish has updated manual build instructions for VS2015 and greater (as well as VS2008 too) on his
MSVC Hercules Build Instructions
web page, although as mentioned above, the by far easiest most reliable way to build Hercules
on Windows is to use Bill Lewis's
"Hercules Helper for Windows"
tool, which is designed to build Hercules using much more current versions of Visual Studio.
- Be sure to read the Release Notes
with every new release too, which contains important late-breaking information about each new release.
Windows pre-built binaries:
- Download one of the
pre-built Official Release binaries
from
GitHub.
- (Optional) You might also want to install Fish's
Hercules GUI for Windows
and/or one or more of his other Hercules products.
Building from source - Mac OS X
Important - Not Recently Tested. May be obsolete.
- Install Xcode from the
App Store.
- Install Homebrew using the procedure described
at http://brew.sh/
- Use these commands to install pre-requisite software:
brew install gnu-sed
- Proceed with Building from source - Linux and macOS below.
Building from source - Linux and macOS (High Sierra and newer)
Important: Please read everything before doing anything. Don't be bashful about asking for help.
Important:
You must use at least version 6.2.0 of the gcc compiler and associated glibc2 library.
Refer to the
Hercules Frequently-Asked Questions page for required
compiler and other software levels.
- Download the
source code .ZIP file
from Github, or even better, clone the repository.
(Note: building from the source code .zip file is strongly discouraged. Instead,
it is highly recommended that you clone the git repository and build from that instead.
This allows the exact version of the source code to be determined, which is very helpful should
a problem need to be diagnosed.)
git clone https://github.com/SDL-Hercules-390/hyperion.git <directory-name>
Note: By downloading the .zip file (or cloning the repository) you agree to the terms
of the Q Public Licence.
- Be sure to read the Release Notes
with every new release, which contains important late-breaking information about each new release.
- Install the required packages appropriate for your system.
- Debian / Ubuntu / Mint / etc
        sudo apt-get -y install git wget time

        sudo apt-get -y install build-essential cmake flex gawk m4 autoconf automake libtool-bin libltdl-dev

        sudo apt-get -y install libbz2-dev zlib1g-dev

        sudo apt-get -y install libcap2-bin
Note: For Regina REXX to run the included tests:
sudo apt-get -y install libregina3-dev
- Elbrus Linux (similar to Debian)
        sudo apt-get -y install git wget time

        sudo apt-get -y install build-essential cmake flex gawk m4 autoconf automake libtool

        sudo apt-get -y install bzip2 zlib

        sudo apt-get -y install libcap
- Arch / Manjaro
        sudo pacman -S --needed --noconfirm git wget

        sudo pacman -S --needed --noconfirm base-devel make cmake flex gawk m4 autoconf automake

        sudo pacman -S --needed --noconfirm bzip2 zlib
- Fedora
        sudo dnf -y install git wget

        sudo dnf -y install gcc make cmake flex gawk m4 autoconf automake libtool-ltdl-devel

        sudo dnf -y install bzip2-devel zlib-devel
- CentOS / AlmaLinux / Rocky Linux 8+ / Red Hat RHEL 9
        sudo yum -y install git wget time

        sudo yum -y install gcc make cmake flex gawk m4 autoconf automake libtool-ltdl-devel

        sudo yum -y install bzip2-devel zlib-devel
Note: On CentOS 9, the following command is required before installing the packages:
sudo yum config-manager --set-enabled crb
Note: On Red Hat RHEL 9, the following command is required before installing the packages:
(refer here for more information)
sudo subscription-manager repos --enable codeready-builder-for-rhel-9-$(arch)-rpms
- CentOS 7
        sudo yum -y install git wget

        sudo yum -y install gcc make flex gawk m4 autoconf automake libtool-ltdl-devel

        sudo yum -y install bzip2-devel zlib-devel
Note: On CentOS 7, there is no package for CMAKE 3.x, it must be built from source.
- openSUSE (15.1+)
    sudo zypper install -y git

    sudo zypper install -y -t pattern devel_basis autoconf automake cmake flex gawk m4 libtool

    sudo zypper install -y -t pattern bzip2 libz1 zlib-devel

    sudo zypper install -y libcap-progs
- Apple Darwin (macOS High Sierra, Mojave, Catalina, Big Sur, etc.) with Homebrew
        xcode-select --install

        /bin/bash -c "$(curl -fsSL https://raw.githubusercontent.com/Homebrew/install/HEAD/install.sh)"


        brew install wget gsed

        brew install cmake autoconf automake libtool
Note: So configure/make will find ltdl.h and libltdl:
        export CFLAGS="$CFLAGS -I$(find $(brew --cellar libtool) -type d -name "include" | sort -n | tail -n 1)"

        export LDFLAGS="$LDFLAGS -L$(find $(brew --cellar libtool) -type d -name "lib" | sort -n | tail -n 1)"
And include these options to configure:
        --disable-getoptwrapper

        --without-included-ltdl
- Apple Darwin (macOS Big Sur) with MacPorts
Information on installing MacPorts may be found
here.
        sudo port install wget gsed

        sudo port install cmake autoconf automake libtool
Note: So configure/make will find ltdl.h and libltdl:
export CFLAGS=-I/opt/local/include LDFLAGS=-L/opt/local/lib
- FreeBSD
        sudo pkg install -y bash git wget

        sudo pkg install -y gmake autoconf automake cmake flex gawk m4 libltdl

        sudo pkg install -y bzip2
Note: Bash is required by parts of the build apparatus.
Note: So configure/make will find ltdl.h and libltdl:
export CFLAGS=-I/usr/local/include LDFLAGS=-L/usr/local/lib
- OpenBSD is not currently supported
- Verify you have all of the correct versions of the more important packages installed:
./util/bldlvlck
Please note that SDL Hyperion comes pre-delivered with an already pre-generated
./configure script, so doing a ./autogen.sh is
not necessary and is in fact now strongly discouraged.
An autogen would only be necessary if you were to manually make some changes
to the Hercules default Makefile.am and/or configure.ac
files (which under normal circumstances you should never need to do).
- Download and build all External Packages, if needed:
Hercules links with several pre-built "External Package" static link libraries
that have been pre-built for you and come distributed with Hercules (i.e. they
are a part of the Hercules repository).
Currently all of the external package static link libraries for the Intel x86
(32-bit) and x64 (64-bit) architectures for both Windows and Linux for both
normal optimized Release builds as well as unoptimized Debug builds are already
provided as part of the distribution. Thus to build Hercules you should not
need to do anything special. Simply build Hercules just as you normally would.
In some unusual situations however, you MIGHT need to rebuild ALL existing
external packages for your particular system. Exactly what those situations
are and what causes them to occur is unclear, but one thing is certain: it
will never hurt to build all of the external packages anyway just to be safe.
If you wish to modify or debug any of the external packages themselves (or need
to build a non-Intel x86/x64 architecture build of Hercules however, such as arm, mips,
ppc, sparc, xscale, etc), then you will need to manually build each of the
external packages first in order to create the static link libraries that Hercules
will need to link with, before you can then build Hercules.
For more detailed External Package build information please refer to the
README.EXTPKG
document.
- Configure Hercules for your system:
./configure
By default, the configure script will attempt to guess appropriate
compiler optimization flags for your system. If its guesses
turn out to be wrong, you can either specify your own optimization
flags with --enable-optimization=FLAGS
(preferred) or else as a last resort disable all optimization
by passing the --disable-optimization option
instead (not recommended). For additional configuration
options, run: ./configure --help=short.
For Apple macOS, these additional configure switches are recommended:
        --disable-getoptwrapper

        --without-included-ltdl
- Build the executables:
make
- (Optional) Install the programs:
sudo make install
This is an optional step because once Hercules is built, you should be able to
run Hercules directly from the Hercules build directory itself without needing
to install anything beforehand. But if you want to officially install it somewhere,
then by all means do so.
It should be mentioned however, that if you do decide to run directly out of the
build directory, you should first set the 'cap_sys_nice' capabilities on the
Hercules executables and start Hercules as root. This will allow Hercules to
properly set the priorities of its internal threads:
sudo setcap 'cap_sys_nice=eip' ./hercules
sudo setcap 'cap_sys_nice=eip' ./herclin
sudo setcap 'cap_net_admin+ep' ./hercifc
You don't need to do this if you do sudo make install however
since the makefile does this for you. You only need to do this when you decide
to not install the results of the build and run directly out of the build
directory instead.
Configuration
You will need to amend the configuration file
hercules.cnf to reflect your device layout and intended
mode of operation (S/370, ESA/390, or z/Architecture).
See the Hercules Configuration File page for
a complete description.
Creating DASD volumes
The Creating Hercules DASD page
describes various methods of creating and loading virtual DASD
volumes. The compressed CKD DASD support is described in this page.
Operating Procedure
|
Note! If you intend to run any licensed software on your PC
using Hercules, it is your responsibility to ensure that
you do not violate the software vendor's licensing terms!
|
|
|
|
Note: Hercules requires privileged access to your host's
networking devices in order for Hercules networking to work properly.
If your configuration contains any networking devices, then
Hercules must be started with Administrative (root) privileges.
If Hercules is not started with Administrative (root) privileges then
initialization of your networking devices will fail and your guest's
networking will not work properly. If your guest does not need access
to your host's network Hercules should be run as a normal unprivileged
user (the default).
|
Hercules can operate in either of two modes: (semi-)graphical "panel"
mode or simple non-graphical standard command-line mode.
The default semi-graphical "panel" mode of operation is invoked by the
"hercules.exe" executable, and the non-graphical standard command-line
mode by the "herclin.exe" executable. They are both exactly identical
except for how the terminal screen is managed.
In the normal (default) semi-graphical "panel" mode, hercules.exe draws
to screen directly itself, and does not rely on any terminal manager
functionality (Terminal or Command-Prompt program). It paints (draws)
messages and other information (such as its command line and CPU status
line) on specific screen lines starting at specific columns, etc:
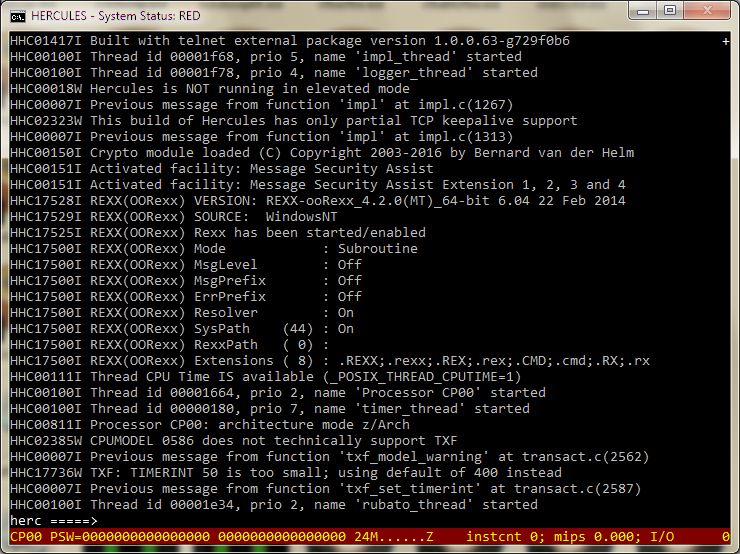
hercules.exe managed Hardware Machine Console (HMC)
It relies on certain keystrokes (such as the PageUp and PageDown keys,
etc) to perform actions such as displaying previously issued messages
and switching to its alternate semi-graphical display panel via the Esc.
key (which shows an overall summary of the machine's state, such as its
current set of register values, list of devices, etc):
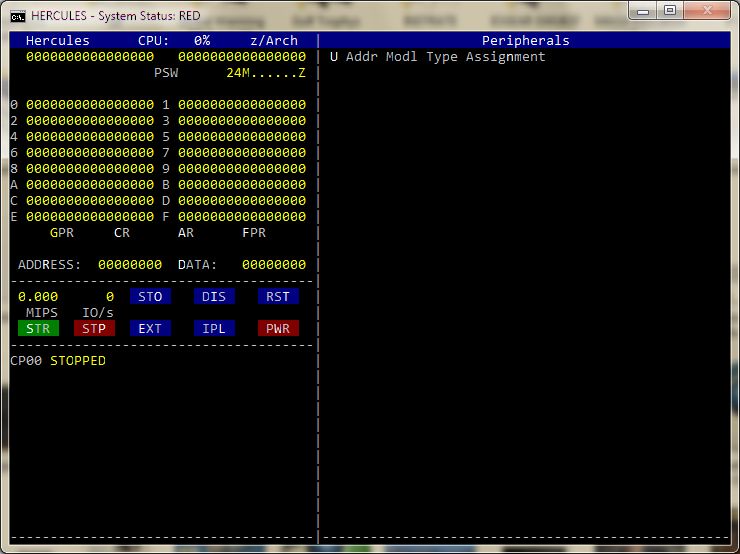
hercules.exe managed semi-graphical panel
When started in standard command-line mode via "herclin.exe", the terminal
screen is managed completely by your host operating system's terminal
management software. Hercules does not paint the screen itself at all. It simply
issues messages to "stdout" just like any other command-line program and your operating
system's terminal management software decides where on the screen that line
will be displayed. Additionally, Hercules does not read directly from the
command-ine itself either. Instead, it simply reads from "stdin" and processes
the commands it reads. Your host operating system's terminal manager is in charge
of managing the command-line, not Hercules:

Unmanaged "herclin.exe" terminal
screen,
scrolled back several screens to see previously issued terminal commands.
In standard "herclin.exe" command-line mode, Hercules operates just like any other
normal command-line program, and you can use the Terminal's scroll bar (if it has
one) and/or your mouse's scroll wheel to scroll the screen backward or forward to
see previously issued messages and/or commands and their responses. Your host
operating system's terminal manager is in charge of painting the screen and reading
the command line, not Hercules.
Command line arguments
To start Hercules in the default "panel" operating mode, enter this command
at the host's command prompt:
    hercules  [ -f filename ]           |  [ --config=filename ]
              [ -o logfile]             |  [ --output=logfile ]  |  [ --logfile=logfile ]
              [ -r rcfile ]             |  [ --rcfile=rcfile ]
              [ -b logofile ]           |  [ --herclogo=logofile ]
              [ -d ] DEPRECATED         |  [ --daemon ] DEPRECATED
              [ -n ]                    |  [ --NoUI ]
              [ -e ]                    |  [ --externalgui ]
              [ -p modpath ]            |  [ --modpath=modpath ]
              [ -l modname ] ...        |  [ --ldmod=modname ] ...
              [ -s symbol=value ] ...   |  [ --defsym=symbol=value ] ...
              [ -v ]                    |  [ --verbose ]
              [ -h ]                    |  [ --help[=type] ]
              [ -t[factor]]             |  [ --test[=factor]]

              [ > logfile ]
where:
filename-
is the name of the configuration file.
The default, if none is specified, is hercules.cnf.
The default may be overridden via the "
HERCULES_CNF"
environment variable. If the value "none" is specified as the
name of the configuration file, then Hercules is started without a
configuration file using internal default values and no devices.
Alternatively, specifying the filename as "NUL" on
Windows or "/dev/null" on Linux means the same thing
as specifying "none".
logfile-
is the name of the optional log file. A log file receives a copy
of all messages displayed on the Hercules control panel.
PLEASE NOTE: providing a logfile is extremely important
for bug reporting and problem analysis purposes! It is strongly
recommended that you always specify this option!
rcfile-
is the name of the Hercules .rc run commands file.
The run commands file automatically executes panel commands upon
startup. If not specified, the value of the "
HERCULES_RC"
environment variable is used. If no environment variable is defined,
the default value "hercules.rc" is used. If the default "hercules.rc"
file is not found, then the value "none" is used, indicating
an .rc file will not be used.
logofile-
is the name of the Hercules logo file. The logo file is the
initial welcome screen presented when a TN 3270 terminal connects
to a hercules 3270 device.
--daemon (deprecated)-
This option has been deprecated due to its confusing name. Please use the below
'--NoUI' option instead.
--NoUI-
specifies that Hercules is to be run invisibly in "No User Interface" mode, wherein it
runs in the backgroud without any attached console or keyboard.
Please Note that Hercules's "No User Interface mode" is not the same
as e.g. Linux's daemon mode. It is quite different. Refer to our
"Running Hercules in "No User Interface" mode"
web page for more information.
--externalgui-
indicates Hercules is to be controlled by an External GUI.
modpath-
is the directory from which dynamic modules are to be loaded.
This option overrides both the
MODPATH
configuration file statement and system defaults.
The system default varies depending on the host platform
where Hercules is being run.
modname-
is the name of an additional dynamic module to be loaded
at startup. More than one additional module may be specified,
although each must be preceded with the
-l
option specifier.
symbol=value-
the name of a symbol and its associated value to be used in configuration
file processing or panel commands. See the command 'defsym'
for more information on using symbols. The '-s' option may be repeated.
Note: 'value' may be quoted to contain embedded blanks.
--verbose-
sets the message-level to verbose. This is the same as
entering the command
msglvl +verbose.
--help[=type]-
displays help regarding the syntax of command-line arguments and,
optionally, other information as well if the optional help
type is also specified.
The optional type value identifies what type of help
you want to display. Valid values are: short,
long, version or build.
Additionally, all and full are also
accepted as aliases for long.
The short help option displays just the syntax of the
the command line arguments. The version help option
displays version information. The build option displays
some of the more important optional features that Hercules was
either built with or without. The long, all
and full options displays all three types. The default
is short (i.e. only the command-line syntax is shown).
--test[=factor]-
starts Hercules in test mode, activating special .rc file script
commands used only by QA test scripts. Normal Hercules use should
never specify this switch.
factor is an optional test timeout factor within the
range 1.0 to 14.3. The test timeout factor is used to adjust each
test script's specified timeout value to compensate for the speed
of the system on which they are running.
Use a factor greater than 1.0 on slower systems to slightly increase
timeout values giving each test more time to complete.
Please note that due to manner in which command line arguments are
parsed this option must be specified as one argument. Thus "-t2.0"
is correct whereas "-t 2.0" is not. Oftentimes it is easier
to use the long --test=factor syntax instead.
Test timeout values (specified as optional arguments on the special
runtest script command) are a safety feature designed to prevent
runaway tests from never ending. Normally tests end automatically
the very moment they are done.
logfile-
is the name of the optional (but highly recommended!) log file.
The log file receives a copy of all messages displayed on the
control panel and is extremely important to have for problem
analysis and bug reporting.
Next connect a tn3270 client to the console port (normally port 3270).
The client will be connected to the first 3270 device address specified
in the configuration file (this should be the master console address).
If your master console is a 1052 or 3215, connect a telnet client
instead of a tn3270 client.
Now you can enter an ipl command from the control panel.
Using the keyboard
In the default "panel" operating mode, the main Hercules screen contains
a scrollable list of messages with a command input area and system status
line at the bottom of the screen. (see further above)
To scroll through the messages, use either the Page Up or Page Down keys,
the Ctrl + Up Arrow or Ctrl + Down Arrow keys, or the Home or End and/or
the Ctrl + Home or Ctrl + End keys.
Use the Insert key to switch between insert and overlay mode when typing in
the command input area. Use the Home and End keys to move to the first or
last character of the command you are typing, or the use the left/right arrow keys
to move to a specific character. Use the Escape key to erase the input area.
Pressing Escape when the command input area is already empty causes the screen
to switch to the semi-graphical "New Panel" display mode, which shows the overall
status of the system and devices.
When in the semi-graphical "New Panel" display mode there is no command input
area. Instead, single character "hot keys" are used to issue some of the more
common functions such as starting or stopping the CPU. The hot-keys are those
which are highlighted. Pressing the '?' key displays brief help information
on how to use the semi-graphical panel.
| Normal cursor handling
|
| Key |
Action |
|
Esc
|
Erases the contents of the command input area.
If the command input area is already empty,
switches to semi-graphical New Panel.
|
|
Del
|
Deletes the character at the cursor position.
|
|
Backspace
|
Erases the previous character.
|
|
Insert
|
Toggles between insert mode and overlay mode.
|
|
Tab
|
Attempts to complete the partial file name at the
cursor position in the command input area. If more
than one possible file exists, a list of matching
file names is displayed.
|
|
Home
|
Moves the cursor to the start of the input in the
command input area. If the command input area is
empty, scrolls the message area to the top.
|
|
End
|
Moves the cursor to the end of the input in the
command input area. If the command input area is
empty, scrolls the message area to the bottom.
|
|
Page Up
|
Scrolls the message area up one screen.
|
|
Page Down
|
Scrolls the message area down one screen.
|
|
Up arrow
|
Recalls previous command into the input area.
|
|
Down arrow
|
Recalls next command into the input area.
|
|
Right arrow
|
Moves cursor to next character of input area.
|
|
Left arrow
|
Moves cursor to previous character of input area.
|
|
Ctrl + Up arrow
|
Scrolls the message area up one line.
|
|
Ctrl + Down arrow
|
Scrolls the message area down one line.
|
|
Ctrl + Home
|
Scrolls the message area to the top.
|
|
Ctrl + End
|
Scrolls the message area to the bottom.
|
The following additional keyboard functions are effective when the
Hercules Extended Cursor Handling feature (OPTION_EXTCURS) is activated
at compile time.
At present, this feature is activated on the Windows platform only:
| Extended cursor handling
|
| Key |
Action |
|
Alt + Up arrow
|
Moves cursor up one row.
|
|
Alt + Down arrow
|
Moves cursor down one row.
|
|
Alt + Right arrow
|
Moves cursor right one column.
|
|
Alt + Left arrow
|
Moves cursor left one column.
|
|
Tab
|
If cursor is outside the command input area,
moves cursor to the start of the input in the
command input area.
Otherwise behaves as described in previous table.
|
|
Home
|
If cursor is outside the command input area,
moves cursor to the start of the input in the
command input area.
Otherwise behaves as described in previous table.
|
|
End
|
If cursor is outside the command input area,
moves cursor to the end of the input in the
command input area.
Otherwise behaves as described in previous table.
|
Panel commands
The following is what is displayed on the Hercules hardware console (HMC)
in response to the '?' command being entered. Please note that it may not
be completely accurate or up-to-date. Enter the '?' command for
yourself for a more complete, accurate and up-to-date list of supported
panel commands:
     Command               Description
     ----------------      -----------------------------------------------
     !message             *SCP priority message
     #                     Silent comment
     $locate               Display sysblk, regs or hostinfo
     $runtest             *Start the test if test mode is active
     $test                *Your custom command (*DANGEROUS!*)
     $zapcmd              *Enable/disable command (*CAREFUL!*)
     *                     Loud comment
     .reply               *SCP command
     ?                     alias for help
     abs                  *Display or alter absolute storage
     aea                   Display AEA tables
     aia                   Display AIA fields
     alrf                  Command deprecated. Use facility command instead
     ar                    Display access registers
     archlvl              *Set or Query current Architecture Mode
     archmode              Deprecated. Use the archlvl command instead
     asn_and_lx_reuse      Command deprecated. Use facility command instead
     attach               *Configure device
     auto_scsi_mount      *Command deprecated - Use "SCSIMOUNT"
     autoinit             *Display/Set auto-create-empty-tape-file option
     automount            *Display/Update allowable tape automount directories
     b                    *Set breakpoint
     b+                    (Synonym for 'b')
     b-                    Delete breakpoint
     b?                    Query breakpoint
     cachestats            Cache stats command
     cckd                 *Compressed CKD command
     cctape               *Display a printer's current cctape
     cf                   *Configure current CPU online or offline
     cfall                 Configure all CPU's online or offline
     clocks                Display tod clkc and cpu timer
     cmdlvl               *Display/Set current command group
     cmdsep               *Display/Set command line separator
     cmpscpad             *Set/display the CMPSC zero padding value.
     cnslport              Set console port
     codepage             *Set/display code page conversion table
     conkpalv             *Display/alter console TCP keepalive settings
     cp_updt              *Create/Modify user character conversion table
     cpu                  *Define target cpu for panel display and commands
     cpuidfmt              Set format BASIC/0/1 STIDP generation
     cpumodel              Set CPU model number
     cpuprio              *(deprecated)
     cpuserial             Set CPU serial number
     cpuverid             *Set CPU version number
     cr                   *Display or alter control registers
     cscript              *Cancels a running script thread
     ctc                  *Enable/Disable CTC debugging
     define               *Rename device
     defsym               *Define symbol
     delsym               *Delete a symbol
     detach               *Remove device
     devinit              *Reinitialize device
     devlist              *List device, device class, or all devices
     devprio              *(deprecated)
     devtmax              *Display or set max device threads
     diag8cmd             *Set DIAG 8 instruction options
     ds                    Display subchannel
     dumpdev              *Specify bootstrap loader DUMP parameters
     ecps:vm              *Command deprecated - Use "ECPSVM"
     ecpsvm               *ECPS:VM Commands
     engines               Set engines parameter
     evm                  *Command deprecated - Use "ECPSVM"
     exec                 *Execute a Rexx script
     exit                  (Synonym for 'quit')
     ext                   Generate external interrupt
     f?                    Query unusable page frame range(s)
     facility             *Enable/Disable/Query z/Arch STFLE Facility bits
     fcb                  *Display a printer's current FCB
     fpc                  *Display or alter floating point control register
     fpr                  *Display or alter floating point registers
     f{+/-}adr            *Mark page frame(s) as +usable/-unusable
     g                     Turn off instruction stepping and start all CPUs
     gpr                  *Display or alter general purpose registers
     hao                  *Hercules Automatic Operator
     help                 *list all commands / command specific help
     herclogo             *Read a new hercules logo file
     hercnice             *(deprecated)
     hercprio             *(deprecated)
     hst                  *History of commands
     http                 *Start/Stop/Modify/Display HTTP Server
     hwldr                *Specify boot loader filename
     i                     Generate I/O attention interrupt for device
     iodelay              *Display or set I/O delay value
     ipending              Display pending interrupts
     ipl                  *IPL from device or file
     iplc                 *Command deprecated - use IPL with clear option
     k                     Display cckd internal trace
     ldmod                *Load a module
     legacysenseid         Set legacysenseid setting
     loadcore             *Load a core image file
     loaddev              *Specify bootstrap loader IPL parameters
     loadparm             *Set the default IPL 'LOADPARM' parameter
     loadtext             *Load a text deck file
     locks                *Display internal locks list
     log                  *Direct logger output
     logopt               *Set/Display logging options
     lparname             *Set LPAR name
     lparnum              *Set LPAR identification number
     lsdep                 List module dependencies
     lsequ                 List device equates
     lsmod                *List dynamic modules
     mainsize             *Define/Display mainsize parameter
     manufacturer          Set STSI manufacturer code
     maxcpu                Set maxcpu parameter
     maxrates             *Display highest MIPS/SIOS rate or set interval
     message              *Display message on console a la VM
     model                *Set/Query STSI model code
     modpath              *Set module load path
     mounted_tape_reinit  *Control tape initialization
     msg                   Alias for message
     msglevel             *Display/Set current Message Display output
     msglvl                Alias for msglevel
     msgnoh                Similar to "message" but no header
     mt                   *Control magnetic tape operation
     netdev               *Set default host networking device
     numcpu                Set numcpu parameter
     osa                  *(Synonym for 'qeth')
     ostailor             *Tailor trace information for specific OS
     o{+/-}dev             Turn ORB tracing on/off
     panopt               *Set or display panel options
     panrate               (deprecated; use PANOPT RATE=nnn instead)
     pantitle              (deprecated; use PANOPT TITLE=xxx instead)
     pgmprdos             *Set LPP license setting
     pgmtrace             *Trace program interrupts
     plant                 Set STSI plant code
     pr                   *Display or alter prefix register
     psw                  *Display or alter program status word
     ptp                  *Enable/Disable PTP debugging
     ptt                  *Activate or display internal trace table
     qcpuid               *Display cpuid(s)
     qd                   *Query device information
     qeth                 *Enable/Disable QETH debugging
     qpfkeys               Display the current PF Key settings
     qpid                  Display Process ID of Hercules
     qports                Display TCP/IP ports in use
     qproc                 Display processors type and utilization
     qstor                 Display main and expanded storage values
     quiet                *Toggle automatic refresh of panel display data
     quit                 *Terminate the emulator
     r                    *Display or alter real storage
     restart               Generate restart interrupt
     resume                Resume hercules
     rexx                 *Modify/Display Hercules's Rexx settings
     rmmod                 Delete a module
     s                    *Instruction stepping
     s+                   *Activate instruction stepping
     s-                    Turn off instruction stepping
     s?                   *Query instruction stepping
     savecore             *Save a core image to file
     sclproot             *Set SCLP base directory
     scpecho              *Set/Display option to echo to console and history of scp replies
     scpimply             *Set/Display option to pass non-hercules commands to the scp
     script               *Run a sequence of panel commands contained in a file
     scsimount            *Automatic SCSI tape mounts
     sf+dev               *Add shadow file
     sf-dev               *Delete shadow file
     sfc                  *Compress shadow files
     sfd                  *Display shadow file stats
     sfk                  *Check shadow files
     sh                   *Shell command
     shcmdopt             *Set shell command options
     shrd                 *shrd command
     shrdport             *Set shrdport value
     sizeof                Display size of structures
     srvprio              *(deprecated)
     ssd                  *Signal shutdown
     start                *Start CPU (or printer/punch device if argument given)
     startall              Start all CPU's
     stop                 *Stop CPU (or printer/punch device if argument given)
     stopall               Stop all CPU's
     store                 Store CPU status at absolute zero
     suspend               Suspend hercules
     symptom               Alias for traceopt
     sysclear             *System Clear Reset manual operation
     sysepoch              Set sysepoch parameter
     sysreset             *System Reset manual operation
     s{+/-}dev             Turn CCW stepping on/off
     t                    *Set tracing range or Query tracing
     t+                   *Turn on instruction tracing
     t+-                  *Automatic instruction tracing
     t-                    Turn off instruction tracing
     t?                   *Query instruction tracing values
     threads              *Display internal threads list
     timerint             *Display or set timers update interval
     tlb                   Display TLB tables
     toddrag               Display or set TOD clock drag factor
     todprio              *(deprecated)
     traceopt             *Instruction and/or CCW trace display option
     tt32                 *Control/query CTCI-WIN functionality
     txf                  *Transactional-Execution Facility tracing
     tzoffset              Set tzoffset parameter
     t{+/-}CKD [devnum]    Turn CKD Search Key tracing on/off
     t{+/-}dev             Turn CCW tracing on/off
     u                    *Disassemble storage
     uptime                Display how long Hercules has been running
     v                    *Display or alter virtual storage
     version               Display version information
     xpndsize             *Define/Display xpndsize parameter
     yroffset              Set yroffset parameter

      (*)  Enter "help <command>" for more info.
The ipl command may also be used to perform a load from cdrom or
server. For example if a standard SuSE S/390 Linux distribution CD is loaded
and mounted on /cdrom for example, this cdrom may then be ipl-ed by:
ipl /cdrom/suse.ins
The attach and detach commands are used to dynamically
add or remove devices from the configuration,
and the define command can be used to alter the device number
of an existing device.
The devinit command can be used to reopen an existing device.
The args (if specified) override the arguments
specified in the configuration file for this device.
The device type cannot be changed and must not be specified.
This command can be used to rewind a tape, to mount a new tape or
disk image file on an existing device, to load a new card deck
into a reader, or to close and reopen a printer or punch device.
In single-step mode, pressing the enter key will advance to the
next instruction.
There is also an alternate semi-graphical control panel. Press Esc to
switch between the command line format and the semi-graphical format.
Press ? to obtain help in either control panel.
When a command is prefixed with '-' (minus sign or dash), then
the command will not be redisplayed at the console. This can be used in scripts
and is also used internally when commands are to be invoked without being
redisplayed at the panel.
Additional Command Help
Some commands also offer additional help information regarding their syntax,
etc. Enter "help <command name>" to display
this additional help information. (Note: not every command supports additional help)
The hercules.rc (run-commands) file
Hercules also supports the ability to automatically execute panel commands
upon startup via the 'run-commands' file. If the "hercules.rc" run-commands file
is found to exist in the current directory when Hercules starts, each line
contained within it is read and interpreted as a panel command exactly as if
the command were entered from the HMC system console.
The default filename for the run-commands file is "hercules.rc" and is presumed
to exist in the current directory, but may be
overridden by setting the "HERCULES_RC" environment variable
to the desired filename. (Note that the overriding filename may be either just a name
or a full-path or relative-path filename.)
Except for the 'pause' command (see paragraph further below), each command
read from the run-commands file is logged to the console preceded by a '> '
(greater-than sign) character so you can easily distinguish between panel
commands entered from the keyboard from those entered via the .rc file.
Lines starting with '#' (pound or hash) are treated as "silent comments" and are
thus not logged to the console. Line starting with '*' (asterisk) however are
treated as "loud comments" and will be logged.
In addition to being able to execute any valid panel command (including the
'sh' shell command) via the run-commands file, an additional
'pause nnn' command is supported in order to introduce
a brief delay before reading and processing the next line in the file. The
value nnn can be any number from 0.001 to 999.0 and specifies
the number of seconds to delay before reading the next line. Creative use of
the run-commands file can completely automate Hercules startup.
The "Hercules Automatic Operator" (HAO) Facility
The Hercules Automatic Operator (HAO) feature is a facility which can
automatically issue panel commands in response to specific messages
appearing on the Hercules console.
To use the Hercules Automatic Operator facility, you first define a "rule"
consisting of a "target" and an associated "command". The "target" is
a regular expression pattern used to match against the text of the various
messages that Hercules issues as it runs. Whenever a match is found, the
rule "fires" (is triggered) and its associated command is automatically issued.
The Hercules Automatic Operator facility only operates on messages issued
to the Hercules console. These messages may originate from Hercules itself,
or from the guest operating system via the SCP SYSCONS interface or via the
integrated console printer-keyboard (3215-C or 1052-C). HAO cannot intercept
messages issued by the guest operating system to its own 3270 terminals.
Defining a Rule
To define a HAO rule, enter the command:
hao tgt target
to define the rule's "target" match pattern,
followed by a second command:
hao cmd command
to define that rule's associated panel-command.
The target is a regular expression as defined by your host platform.
When running on Linux, Hercules uses POSIX Extended Regular Expression syntax.
On a Windows platform, regular expression support is provided by
Perl Compatible Regular Expression (PCRE).
The HAO facility can only be used if regular expression support was included
in Hercules at build time.
The associated command is whatever valid Hercules panel command you
wish to issue in response to a message being issued that matches the given
target pattern.
Substituting substrings in the command
The command may contain special variables $1, $2, etc, which will be
replaced by the values of "capturing groups" in the match pattern.
A capturing group is a part of the regular expression enclosed in parentheses
which is matched with text in the target message. In this way, commands may be
constructed which contain substrings extracted from the message which
triggered the command.
The following special variables are recognized:
$1 to $9 -
the text which matched the 1st to 9th capturing
group in the target regular expression
$` - the text preceding the regular expression match
$' - the text following the regular expression match
$$ - replaced by a single dollar sign
Note that substitution of a $n variable does not occur if there are
fewer than n capturing groups in the regular expression.
As an example, the rule below issues the command "i 001F" in response to
the Hercules message "HHC01090I 0:001F COMM: client 127.0.0.1 devtype 3270:
connection reset":
   hao tgt HHC01090I .:([0-9A-F]{4}) COMM: .* connection reset
   hao cmd i $1
Another example, shown below, illustrates how the dot matrix display of a
3590(?) tape unit might be used to implement an automatic tape library in
response to the Hercules message "HHC00224I 0:0581 Tape file *, type
HET: display "K2DSBK2 " / "M2DSBK3S" (alternating)":
   hao tgt HHC00224I .:([0-9A-F]{4}) Tape file .*: display (?:".{8}" \/ )?"M([A-Z0-9]{1,6})\s*S"
   hao cmd devinit $1 /u/tapes/$2.aws
Which would result in the Hercules command "devinit 0581 /u/tapes/2DSBK3.aws"
being automatically issued.
More information about Perl Compatible Regular Expression (PCRE) syntax (as well as a nice online web page that allows you to test your expressions) can be found here:
Other commands and limitations
To delete a fully or partially defined HAO rule, first use the "hao list"
command to list all of the defined (or partially defined) rules, and then use
the "hao del nnn" command to delete the specific rule identified by
nnn (all rules are assigned numbers as they are defined and are thus
identified by their numeric value). Optionally, you can delete all defined or
partially defined rules by issuing the command "hao clear".
The current implementation limits the total number of defined rules to 64.
This limit may be raised by increasing the value of the HAO_MAXRULE
constant in source file hao.c and then rebuilding Hercules.
All defined rules are checked for a match each time Hercules issues a message.
There is no way to specify "stop processing subsequent rules". If a message is
issued that matches two or more rules, each associated command is then issued
in sequence.
Technical Support
For technical support, please see our Technical Support web page.
